How to Make a Reflection in Photoshop and Take Product Photos to the Next Level
What will your appearance show
BECKY KILIMNIK
Figuring out how to make an appearance in Photoshop is an incredible method to make item photographs look exact. With a couple of straightforward advances, you can put your item on a drastically intelligent glass; a couple of more advances, and you can make the dream that your item is sitting in an unmistakable pool of water.
Get free online business and item photography tips
Email address
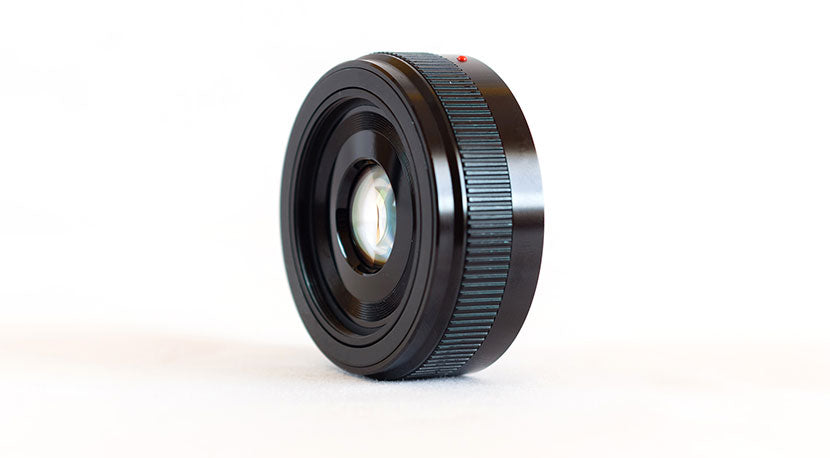
For the Photoshop instructional exercise underneath, utilize a photograph that includes the item at eye-level, similar to the picture of the focal point beneath. This'll make making a reflection a simple cycle, when contrasted with making an impression of a calculated article, which is much more drawn-out and convoluted. In the event that the item is shot against a white foundation, that interaction is significantly simpler.
Instructions to make an appearance in Photoshop
Step by step instructions to reflect or draw balance
Step by step instructions to add a layer cover
Step by step instructions to make a glass reflection
Step by step instructions to make a water reflection
Instructions to reflect or draw evenness
To reflect in Photoshop, you need to make evenness.
How would you attract balance Photoshop?
Utilize the Flip Vertical capacity of the Transform device. This capacity makes an ideal identical representation of your determination. You'll at that point use layer covers to change the reflection until it looks practical.
Instructions to add a layer veil
How would you add a layer cover in Photoshop? You can make layer covers pretty effectively by choosing the layer, and afterward tapping on the Layer Mask symbol at the lower part of the Layers board. We'll stroll through how to make a veil and how to utilize it to change your appearance in the instructional exercise ventures underneath.
Step by step instructions to make a glass appearance in Photoshop
Develop your material
Select your article
Copy and flip your article
Make ideal evenness with your appearance
Add a layer veil
Tidy up shadows
The picture of this focal point is ideal for an item appearance in Photoshop in light of the fact that the item is seen head-on, and the foundation of the focal point rests along the skyline line.
Stage 1: Enlarge your material

Your material size should be adequately large to oblige your item's appearance. From the dropdown menu at the highest point of the application window, pick Image > Canvas Size… .
In the discourse take care of that pops, click on the anchor bolt pointing straightforwardly up (top center square of the anchor lattice) and set the material tallness to twice its unique stature.
Stage 2: Select your item
In this specific picture, the image has a white foundation. Be that as it may, we would prefer not to mirror the shadow, just the article. To do as such, utilize the Magic Wand apparatus (situated in the Toolbar on the left-hand side of the application window) and pick Select Subject. Photoshop will make a determination of your item.
In the event that you need to make a more refined choice, look at the instructional exercise on utilizing the Magic Wand apparatus.
Stage 3: Duplicate and flip your item
With your item actually chose, duplicate your article by composing CTRL+C (COMMAND+C on a Mac). At that point glue the item by composing CTRL+V (COMMAND+V on a Mac). The segregated item ought to naturally show up in another layer.
Select your new layer and copy it by picking Layers > Duplicate Layer… from the dropdown menu at the highest point of the application window.
Rename your most reduced layer "Unique." Rename your Layer 1 "Reflection," and rename your Layer 1 duplicate "Item." Make sure that the Reflection layer is underneath the Product layer in your Layers board.
For more data about working with layers, see the novice's manual for utilizing Layers.
Stage 4: Create ideal balance with your appearance
Select your Reflection layer in the Layers board and pick Edit > Transform > Flip Vertical starting from the drop menu at the highest point of the application window.
With the Reflection layer actually chosen, move the flipped item picture down to rest simply under the item picture utilizing the Move instrument in the toolbar to one side of the application window. You can get the picture with the instrument and pull down while holding SHIFT to keep the picture arranged effectively. You can likewise type the down bolt on your console while holding SHIFT until the picture lines up with the item's pattern. This pattern turns into your mindset.
Stage 5: Add a layer veil
When the item and its appearance are arranged effectively, make a layer veil to make the reflection steadily disappear. To add a layer cover to the Reflection layer, click on the veil symbol at the lower part of the Layers board.
When your veil is made, ensure you have chosen your layer cover (when chosen, your layer veil will seem as though it has a run line around it in the Layers board).
In your Toolbar, set your experience tone to dark and your forefront tone to white.
Select the Gradient apparatus from the toolbar and ensure the angle is set to white-to-dark at the highest point of the application window.
Ensure you actually have your Reflection layer's veil chose. Beginning in your item, define a straight boundary through your picture to the lower part of your appearance.
The outcome will resemble a reflection.
To make the reflection look significantly more reasonable, diminish the murkiness of your Reflection layer until you like the manner in which it looks. Ensure you've chosen the layer and not the veil.
Stage 6: Clean up shadows

Our picture doesn't exactly look right, and this is a direct result of the shadows from the first picture are being projected behind the item. We need to consider how light functions with our appearance in Photoshop.
get to help to link : plus.google.com/url?q=https%3A%2F%2Fimageworkindia.com
images.google.com.ar/url?sa=t&url=https%3A%2F%2Fimageworkindia.com
google.fi/url?sa=t&url=https%3A%2F%2Fimageworkindia.com
images.google.fi/url?sa=t&url=https%3A%2F%2Fimageworkindia.com
maps.google.fi/url?sa=t&url=https%3A%2F%2Fimageworkindia.com
images.google.co.nz/url?sa=t&url=https%3A%2F%2Fimageworkindia.com
google.co.nz/url?sa=t&url=https%3A%2F%2Fimageworkindia.com
maps.google.co.nz/url?sa=t&url=https%3A%2F%2Fimageworkindia.com
images.google.com.pe/url?q=httpss%3A%2F%2Fimageworkindia.com%2F
maps.google.com.pe/url?q=httpss%3A%2F%2Fimageworkindia.com%2F
google.com.pe/url?q=httpss%3A%2F%2Fimageworkindia.com%2F
images.google.com.vn/url?sa=t&url=https%3A%2F%2Fimageworkindia.com
google.com.vn/url?sa=t&url=https%3A%2F%2Fimageworkindia.com
google.pt/url?sa=t&url=https%3A%2F%2Fimageworkindia.com
maps.google.pt/url?sa=t&url=https%3A%2F%2Fimageworkindia.com
images.google.pt/url?sa=t&url=https%3A%2F%2Fimageworkindia.com
maps.google.ro/url?sa=t&url=https%3A%2F%2Fimageworkindia.com
google.ro/url?sa=t&url=https%3A%2F%2Fimageworkindia.com
images.google.ro/url?sa=t&url=https%3A%2F%2Fimageworkindia.com
images.google.com.my/url?sa=t&url=https%3A%2F%2Fimageworkindia.com
maps.google.com.my/url?sa=t&url=https%3A%2F%2Fimageworkindia.com
google.com.my/url?sa=t&url=https%3A%2F%2Fimageworkindia.com
images.google.com.ph/url?sa=t&url=https%3A%2F%2Fimageworkindia.com
maps.google.no/url?sa=t&url=https%3A%2F%2Fimageworkindia.com
google.no/url?sa=t&url=https%3A%2F%2Fimageworkindia.com
images.google.no/url?sa=t&url=https%3A%2F%2Fimageworkindia.com
maps.google.co.il/url?sa=t&url=https%3A%2F%2Fimageworkindia.com
images.google.co.il/url?sa=t&url=https%3A%2F%2Fimageworkindia.com
google.co.il/url?sa=t&url=https%3A%2F%2Fimageworkindia.com
images.google.com.sa/url?q=httpss%3A%2F%2Fimageworkindia.com%2F
google.com.sa/url?q=httpss%3A%2F%2Fimageworkindia.com%2F
google.cl/url?sa=t&url=https%3A%2F%2Fimageworkindia.com
images.google.cl/url?sa=t&url=https%3A%2F%2Fimageworkindia.com
maps.google.cl/url?sa=t&url=https%3A%2F%2Fimageworkindia.com
maps.google.ie/url?sa=t&url=https%3A%2F%2Fimageworkindia.com
google.ie/url?sa=t&url=https%3A%2F%2Fimageworkindia.com
images.google.ie/url?sa=t&url=https%3A%2F%2Fimageworkindia.com
google.sk/url?sa=t&url=https%3A%2F%2Fimageworkindia.com
maps.google.sk/url?sa=t&url=https%3A%2F%2Fimageworkindia.com
images.google.sk/url?sa=t&url=https%3A%2F%2Fimageworkindia.com
maps.google.co.kr/url?sa=t&url=https%3A%2F%2Fimageworkindia.com
google.co.kr/url?sa=t&url=https%3A%2F%2Fimageworkindia.com
images.google.co.kr/url?sa=t&url=https%3A%2F%2Fimageworkindia.com
maps.google.hr/url?sa=t&url=https%3A%2F%2Fimageworkindia.com
google.co.ve/url?sa=t&url=https%3A%2F%2Fimageworkindia.com
maps.google.co.ve/url?sa=t&url=https%3A%2F%2Fimageworkindia.com
images.google.co.ve/url?sa=t&url=https%3A%2F%2Fimageworkindia.com
google.ee/url?sa=t&url=https%3A%2F%2Fimageworkindia.com
maps.google.ee/url?sa=t&url=https%3A%2F%2Fimageworkindia.com
images.google.ee/url?sa=t&url=https%3A%2F%2Fimageworkindia.com
google.com.pk/url?sa=t&url=https%3A%2F%2Fimageworkindia.com
images.google.com.pk/url?sa=t&url=https%3A%2F%2Fimageworkindia.com
google.rs/url?sa=t&url=https%3A%2F%2Fimageworkindia.com
maps.google.rs/url?sa=t&url=https%3A%2F%2Fimageworkindia.com
images.google.rs/url?sa=t&url=https%3A%2F%2Fimageworkindia.com
google.si/url?sa=t&url=https%3A%2F%2Fimageworkindia.com
maps.google.si/url?sa=t&url=https%3A%2F%2Fimageworkindia.com
images.google.si/url?sa=t&url=https%3A%2F%2Fimageworkindia.com
images.google.by/url?sa=t&url=https%3A%2F%2Fimageworkindia.com
google.by/url?sa=t&url=https%3A%2F%2Fimageworkindia.com
maps.google.by/url?sa=t&url=https%3A%2F%2Fimageworkindia.com
images.google.co.ma/url?q=httpss%3A%2F%2Fimageworkindia.com%2F
images.google.com.ec/url?sa=t&url=https%3A%2F%2Fimageworkindia.com
google.com.ec/url?sa=t&url=https%3A%2F%2Fimageworkindia.com
maps.google.com.ec/url?sa=t&url=https%3A%2F%2Fimageworkindia.com
maps.google.lv/url?sa=t&url=https%3A%2F%2Fimageworkindia.com
google.lv/url?sa=t&url=https%3A%2F%2Fimageworkindia.com
To finish our appearance, we'll need to eliminate all shadows aside from the little shadows happening quickly beneath the item. You can utilize a delicate paintbrush set to a similar shading as the foundation (for this situation, white) and tenderly paint over any shadows that shouldn't be there in your Original layer.


0 comments:
Post a Comment